My Free Printable Cards
Printing Instructions & Tips
On this page you can find detailed instructions & tips for better printing results.
Everything I write about here I tried at home on my hp printer.
Of course there are small differences between printers' options but most of the options
I use here are related to Adobe Acrobat Reader options so there shouldn't be any problems.
You can understand that the printing results are up to your printer's abilities.
But I can assure you my printer is a simple inkjet home printer and the results I get are wonderful.
If
you tried to print one of my cards according to my instructions and you
didn't get good results or you have a question please let me know and I
will do my best to help you out.
Here is what you can find on this page:
- Standard Printing Instructions
- Better Quality Results Tips
- Print Two Cards on One A4 Paper
- Printing on an A5 Paper
Please note:
You can print your cards either at home or other print house for
personal use only, but not for resale, license or other distribution.
All Rights Reserved to Nili Binyaminy .
To read more about Terms of Use click here
Standard Printing Instructions
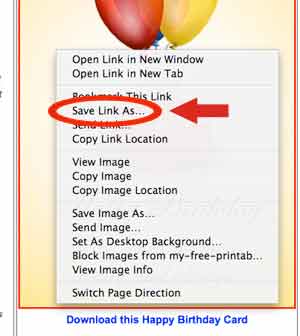
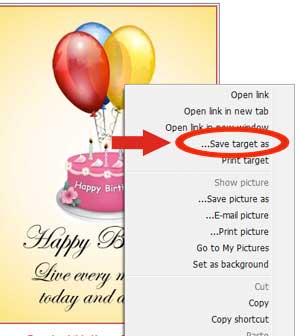
Download Instructions:
- Right click the download link or the card image
- Choose "Save Target As" Or "Save Link As"
and save the pdf file on your computer:
Printing Instructions
- Open If you don't have Adobe Acrobat Reader please click here for fast and free download
- Use A4 paper on your printer
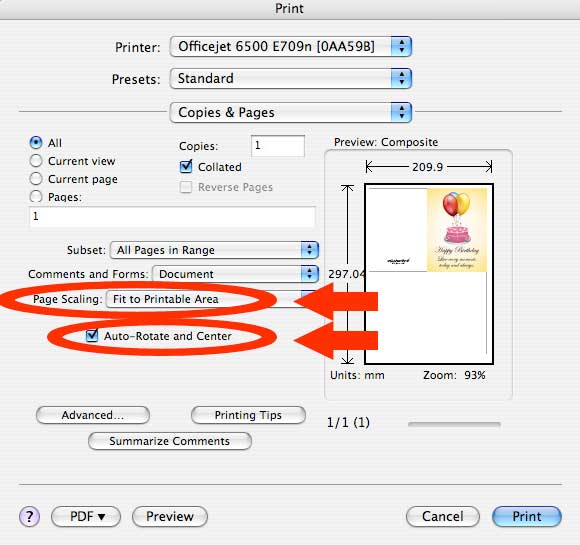
- Select from the menu: File > Print
- Make sure you select Page Scaling > "Fit to Printable Area" and
Check the "Auto-Rotate and center" - Click the Print button
- Cut the paper in half and fold the card (use the gray line as a guide)
Better Quality Results Tips
Use a thicker paper on your printer.
I find that a 120gr paper can make a lot of difference on your card looks & quality. Of course if you use a thicker paper you'll get even better results.
If you'll decide to use a thicker paper you need to change some of the preset printing options:
- Open the card's pdf file with Adobe Acrobat Reader
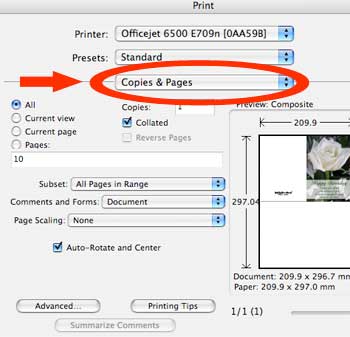
- Go to File > Print...
- Click the Copies & Pages (img1) pop-up menu and select Paper Type/Quality (img2):
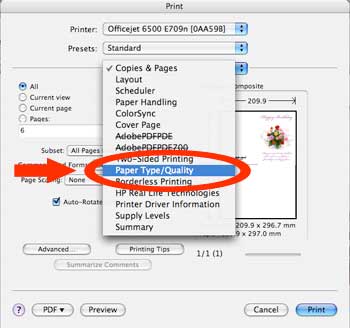
On the Paper Tab:
- Select the Paper Type you are using.
If its only a thicker A4 paper you can leave it on 'Automatic'.img1 - Choose the Quality you want. img2
The better the quality is the more ink your printer uses.
Therefore don't choose a 'High Quality' option if your paper is not thick enough because the paper will not absorb the ink and you'll have a mess.
For example I used a 120gr paper and chose 'Automatic' quality and the result was good.
If you're using high quality photo paper you can choose the 'High Quality' option. - On the Color option I use 'Color Smart'. img3


These are the preset printing options I changed and I got really good results. Let me know how it worked for you and share with me your insights :-) so we can all learn from it and get better results.
Print Two Cards on One A4 Paper
- Print your first card using an A4 sized paper - According to the Standard Printing Instructions
- Put the paper back into your printer's tray so the graphics are facing down and away from the printer .
If you are using an inkjet printer let the ink dry first. Here is a screenshot: - Print your second card - According to the Standard Printing Instructions
- Cut the paper in the middle
Printing on an A5 Sized paper
- Open the card pdf file with Adobe Acrobat Reader
- Go to File > Page Setup... (img1)
- Change the 'Orientation' to Landscape. (img2)
- Press the OK button
- Go to File > Print...
- Make sure you select Page Scaling > None. (img3)
- Make sure the Auto-Rotate and center is NOT Checked. (img4)
- Click the Print Button


I tried this and it worked well. With time I'll try different paper sizes and let you know how it worked. Please share with me/us your experience so we can all benefit from it.
If you have a card size you think is more useful and practical please let me know - maybe I will generate the cards so you can download them in different sizes.
Happy Printing!!!
Nili

Recent Articles
-
Free Printable Calendars
Jan 26, 17 05:47 AM
 FREE Printable calendars!! Beautiful, colorful blank monthly calendars. Choose your calendar download it and print at home.
 -
Passover Cards
Mar 13, 16 03:42 PM
 Free printable Passover cards. A nice collection of Passover greeting cards, choose your favorite, print it and send to your family and loved ones. Happy printing.
 -
Printable Easter Cards
Mar 13, 16 08:07 AM
 Free printable easter cards, Easter gift tags, Egg Hunt Invitations, Easter envelopes! Just choose your favorite design, download and print it... Happy printing.